.
IntroductionArtifacts are one of the most interesting card types in Magic, with support for artifact decks dating all the way back to Magic's second expansion, Antiquities. Although the colorless nature of artifacts has frequently caused developmental issues, they continue to be a theme that is revisited over and over again.
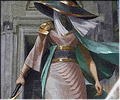
In the Shards of Alara block, the Esper shard featured artifacts - specifically, colored artifacts - as its major theme. The leader of the shard, Sharuum the Hegemon embodies all three colors of the shard - white, blue, and black. White and black are fairly straightforward when looking at her card, as they are the two colors that are best at reanimating things. But the blue is more subtle, and ties into Sharuum's nature as a Sphinx. All Sphinxes ask riddles, and Sharuum is no exception:
What will you build?
This is an artifact-based combo deck with a significant graveyard focus. Its primary goal is to assemble various Rube Goldbergian engines by combining various artifact-based synergies.
.
Commander Analysis

Mana cost:
Sharuum costs a base of six mana, which means she often won't come down until later in the game. We do have some ramp in the form of artifact mana, but casting Sharuum when she costs twelve or more mana can be difficult - at that point, it may be preferable to find some recursion or bounce effect to return her to hand instead.
Sharuum grants us access to Esper colors, which provide access to good card draw and control elements. White and blue both have many artifact synergies as well, while most artifact support in black comes from Sharuum's native home of Esper.
Type: Legendary Creature - Sphinx.
Sphinxes are blue's iconic creature type. There aren't many tribal support cards, but Unesh, Criosphinx Sovereign is an extremely powerful one. Almost all Sphinx lie in the Esper shard colorwise, with them being particularly common in the Esper shard on Alara and in the Azorius guild on Ravnica.
Stats: 5/5
Five power means Sharuum can knock someone out in five hits with commander damage. One could conceivably make a Sharuum voltron deck with cards such as Cranial Plating. Five toughness means Sharuum is also a decent blocker for any unbuffed attackers. She also lives through medium-sized black sweepers, such as Languish.
Flying
The most common evasive keyword. Sharuum is often on blocking duty, since she outsizes most fliers. However, flying means that commander damage is a pretty realistic plan B. She's also great at sniping planeswalkers.
When Sharuum the Hegemon enters the battlefield, you may return target artifact card from your graveyard to the battlefield.
Refurbish on wings. This ability means we want to be playing ways to dump artifacts into our graveyard, especially expensive ones. It's possible to go all-in on reanimation, running cards like Traumatize to fill our graveyard with artifact fatties such as Inkwell Leviathan. This deck instead takes a more midrange approach, primarily using Sharuum to reanimate artifacts that die over the course of the game as a way to generate card advantage. However, Sharuum is also great at grabbing back combo pieces (and functions as a combo piece herself), making the deck more resilient to interaction.
You may enjoy this deck if:
-you like artifacts
-you want your deck to have a theme, and that theme to be LOUD
-you value having a flexible deck capable of operating on multiple axes
-you enjoy winning without combat
This deck may not be for you if:
-you dislike artifacts
-you want to be attacking with creatures
-your meta has tons of grave hate
-you're not comfortable winning with combo
Other Commander Options
- Breya, Etherium Shaper - the addition of red makes Breya likely the strongest artifact commander. Breya doesn't have easy access to recursion or graveyard synergies though, and her power level means she can also draw a lot of hate.
- Sen Triplets - another colored artifact creature from Esper. Often run as a control or theft deck.
- Sydri, Galvanic Genius and Karn, Silver Golem - work well if you want to beat down with your artifacts.
- Yennett, Cryptic Sovereign - another sweet themed Sphinx commander, this time instead building around odd-CMC cards.
- Unesh, Criosphinx Sovereign and Isperia the Inscrutable - good options if you want to build Sphinx tribal, although you lose access to black.
- Arcum Dagsson - an artifact commander that is often even more combo-focused than Sharuum.
- Muzzio, Visionary Architect - another option if you want to cheat in big artifacts, this time bypassing the graveyard.
- Rona, Disciple of Gix and Silas Renn, Seeker Adept - both are capable of recurring artifacts from the graveyard, and generating additional card advantage if they stick around. Rona works well with flicker effects and other legends, while Silas lets you run a second partner commander.
- Thada Adel, Acquisitor - if your favorite artifact is Sol Ring, or you want to play with your opponents' artifacts, she allows for a very different flavor of artifact deck.
.
Decklist
Decklist by Function
Approximate Total Cost:
.
Card Discussiona brief note on card choices
Show
Hide
Something to note when looking over these cards is that I have a self-imposed budget restriction of $2 per card, with exceptions for things I happen to already own or trade for. As a result, when looking over the card choices, I will recommend focusing more on the categories of cards than the individual selections - I make no claims that the cards currently in the deck are optimal, and many possible substitutions exist. This deck leans heavily into artifact-based synergies, and there have been a lot of artifacts printed over the years.
draw
Show
Hide
Card advantage is important, whether it be in the form of card draw, recursion, or something else. As a synergy-based deck, it is often important to assemble a critical mass of relevant pieces (in this case, artifacts) - the faster we can dig through our deck, the faster we can get our various synergy engines and combos online.
- Codex Shredder - while it may not generate card advantage by itself, it does let us accelerate through our deck faster, milling artifacts to recur with Sharuum. Can also mess with top-of-deck tutors, recur other important cards, and serve as a win condition.
- Baleful Strix - vaaaalue. A good blocker, draws a card, and works well with flicker and bounce effects.
- Glint-Nest Crane - not quite as good as Baleful Strix, but it digs deeper if we're looking for something specific.
- Emry, Lurker of the Loch - does pretty much everything we want - cheap, fills the graveyard, generates card advantage.
- Sai, Master Thopterist - generates thopter tokens as blockers, and can cash in spare artifacts for card draw.
- Sauron's Ransom - digs four cards deep, although getting what you want can be a bit inconsistent.
- Thirst for Knowledge - three mana, three cards. Often used to pitch an expensive artifact for reanimation.
- Urza, Powerstone Prodigy - a bit of incidental looting that also ramps.
- Windfall - often a three mana draw-seven. Best if you can dump your hand quickly by playing a bunch of mana rocks. The effect is symmetric, so be careful when casting it.
- Fact or Fiction - digs deep and gives selection, plus it dumps extra cards into the graveyard for recursion.
- Hostile Negotiations - very close to Fact or Fiction #2. It's not quite as consistent, but it does dig a card deeper.
- One with the Machine - we run some expensive artifacts - with Sharuum out, this is a four mana draw-six, which is insane.
- Padeem, Consul of Innovation - protects our stuff, and draws an extra card each turn.
- Shorikai, Genesis Engine - extremely flexible - pitches cards to reanimate, draws cards, makes chump blockers, and can be a beater if the game goes long. Works very well alongside untap effects such as Manifold Key.
- Traverse Eternity - One with the Machine #2.
- Smelting Vat - recycles artifacts into more artifacts. You do need a high density of cheap artifacts to support it, so consider running extra artifact lands if necessary.
- Conjurer's Closet - we run a lot of creatures with ETB effects, so this often lets us use them to draw extra cards. Most notably, it's free to recur with Sharuum, since we can get a second Sharuum trigger with it at end of turn.
- Shimmer Dragon - turns excess artifacts into cards, while also being an evasive, hard-to-kill beater.
- Staff of Nin - draws an extra card each turn, and can get reanimated by Sharuum. Also good at pinging down problematic planeswalkers and creatures like Aven Mindcensor or Kataki, War's Wage.
- Thought Monitor - a cheaper Mulldrifter most of the time.
- The Magic Mirror - you'll usually want to reanimate it with Sharuum, but it can draw a lot of cards.
other options
Show
Hide
There are many, many card draw options available in our colors - more than I could possibly list. Collected here are some of the more synergistic options, and cards which were in older versions of the deck.
- Tezzeret, Agent of Bolas - his (+1) digs for artifacts, and the (-1) can make a blocker in a pinch (or make something like Baleful Strix into a real threat). The ultimate is almost never activated, but it can cause a pretty big life swing.
- Forbidden Alchemy - digs deep, and fills the graveyard.
- Dig through Time and Treasure Cruise - dig deep, and consume the graveyard.
- Vedalken Archmage - best with cheap artifacts, but can draw a lot of cards if it sticks around.
- The Antiquities War - digs deep, and allows for a big attack on the third turn.
- Merchant's Dockhand - easy to tutor up, and can dig deep. A bit expensive to activate though.
- Rona, Disciple of Gix - recurs an artifact, and can generate more card advantage if you turn it sideways. Works well with blink effects, and can also recur legends and sagas.
- Mystic Remora and Rhystic Study - everyone's favorite multiplayer card draw spells.
- Recurring Insight - in terms of pure cards-to-mana ratio, it's hard to beat, often drawing 10+ cards over two turns.
- Thopter Spy Network - makes tokens, and turns our evasive artifact creatures into draw.
- Bolas's Citadel - one of the spicier options - better if your curve is low or you have lifegain, but it's a powerful draw engine that can be recurred by Sharuum.
- Unburial Rites and Animate Dead - if you want to lean more into the reanimator theme, these are good ways to recur creatures.
- Memory Jar - the lower your curve, the better it is. Draws a bunch of cards (temporarily), and can be recurred by Sharuum.
- Trading Post - extremely flexible - pitches cards to reanimate while gaining life, or makes chump blockers, or turns tokens into recursion, or expendable artifacts into cards. A little slow, but works very well alongside untap effects such as Manifold Key.
- Reality Heist - a cheap way to dig for more artifacts
- Painful Truths - three mana, three life, three cards. Cheap and efficient.
- Muzzio, Visionary Architect - we run a high density of artifacts, so this is usually four mana to draw an artifact and play if for free - a solid card advantage engine, and even better if you go bigger with your artifacts.
mana
Show
Hide
Our commander costs six mana, and we have a lot of activated abilities and card draw, which means we can usually find a usage for out mana. Additionally, it can be expensive to deploy multiple combo pieces in a single turn. This deck plays a lot of mana rocks, since we care about artifact synergies. Most of these are on the smaller side, but one could theoretically play a higher curve and bigger mana rocks, to make better use of Sharuum's reanimation ability.
- Everflowing Chalice - usually comes down kicked just once, but it's flexible at any point on the curve, and is a trinket.
- Sol Ring - the most widely-played card in the format. We have a lot of synergies with it due to it being a trinket.
- Arcane Signet, Azorius Signet, Fellwar Stone, Talisman of Dominance, and Talisman of Hierarchy - the default statline for mana rocks in this deck - costs two mana, taps for one, a bit of fixing.
- Thaumatic Compass - helps hit land drops, which gives us a bit more resilience in the fact of mass artifact removal. The flipside can serve as a little additional ramp, but will often be used to ward off attacks.
- Hedron Archive - taps for two, and can be cashed in for cards if we have enough mana. Not a bad target to recur with Sharuum either.
- Krark-Clan Ironworks - usually used as a combo piece, but it does let us turn our board into mana. We're not running any big X spells (such as Torment of Hailfire) to take advantage of that ability, but it could be an interesting direction to take the deck.
- Machine God's Effigy - only taps for one mana, but it also lets you clone Sharuum for combo purposes or any other creature for value.
- Solemn Simulacrum - vaaaalue. A bit of ramp and fixing, works well with flicker effects, and replaces itself when it dies.
other options
Show
Hide
Many mana rocks exist, of varying quality. This section is pretty flexible - if you want more mana, use bigger rocks. If you want more resilient mana, use land fetching.
- Mind Stone and other two-mana rocks - if you find yourself wanting more (or different ones), then switch things up.
- Thran Dynamo - an efficient rock if you want to go bigger.
- Dreamstone Hedron - if you want bigger, but also want to be able to cash it in for cards. Good to recur with Sharuum.
- Blinkmoth Urn - can generate a lot of colorless mana. It is symmetric though.
- Mana Crypt, Mana Vault, and other fast mana - if you happen to own them, they're excellent options.
- Lion's Eye Diamond - most notable as part of the Bomberman combo alongside Auriok Salvagers and any other useful trinket.
- Lotus Bloom - slow to suspend, but can do some very interesting things when recurred (either by Sharuum or Salvaging Station).
- Burnished Hart and Wayfarer's Bauble - less efficient than mana rocks, but lands are usually more resilient.
- Grand Architect - most of our creatures are blue, so this can generate a lot of mana. Also a lord, which most people forget.
interaction
Show
Hide
Unless you're goldfishing, your opponents are likely to interact with you - either by playing their own threats, or removing your cards. It is important to be able to interact back.
- Aether Spellbomb - trinket. Unsummon is a surprisingly effective removal spell, and it can cantrip in a pinch.
- Dispeller's Capsule - trinket. Disenchant solves many problems.
- Executioner's Capsule - trinket. Doom Blade is reasonable removal, although there are certainly some misses.
- Pithing Needle - trinket. Shuts down some commanders, but also useful against planeswalkers and other troublesome activated abilities.
- Soul-Guide Lantern - trinket. Deals with graveyards or cantrips. Notably, some of our win conditions involve milling out our opponents, and this is one of the better ways to deal with Eldrazi such as Ulamog, the Infinite Gyre that would otherwise prevent that mill.
- Cyclonic Rift - often functions as a Time Stretch - force our opponents to spend their time rebuilding so we can advance our own plans. Also brutal if we use it to set up a Windfall.
- Narset's Reversal - not quite a counterspell, but the tempo setback can make it just as good. Stealing a ramp spell or large X spell is also quite strong.
- Anguished Unmaking - deals with almost anything, at the cost of a bit of life.
- Toxic Deluge - one of the cheapest board wipes available, in terms of mana. Deals with indestructible creatures too.
- Terisiare's Devastation - a board wipe that can also ramp.
- Fumigate - a fine board wipe that also pads the life total a bit.
- Time Wipe - wipes the board while also resetting Sharuum or another ETB creature.
- Merciless Eviction - a flexible boardwipe. There are very few problems it can't solve.
- Myr Battlesphere - great at killing planeswalkers, or building an army of blockers.
- Sphinx of the Steel Wind - blocks in the air, hard to kill, gains life. One of the few cards we're explicitly running as a reanimation target.
other options
Show
Hide
White and black both have many excellent options for removal, while blue gives access to all sorts of countermagic. The interaction you should run is often going to be dependent on what sort of decks are present in your meta - if people are running Rest in Peace and
- Leyline of the Void, run more artifact and enchantment removal. If people are running Bane of Progress and Shatterstorm, run more countermagic. Most of the interaction in this deck is aimed at fighting through graveyard and artifact hate, but if you find yourself just getting beat down, then more board wipes or creature removal are also an option.
- Nihil Spellbomb - trinket and grave hate that cantrips. Worth consideration over Soul-Guide Lantern.
- Swan Song, Counterspell, Dovin's Veto, Arcane Denial, Negate, and other countermagic - flexible reactive cards, and good at protecting a combo.
- Utter End, Vindicate, Detention Sphere, Return to Dust, and other removal - more flexible interaction, if you need to solve problems. The most problematic hate pieces are often enchantments - Aura Shards, Rest in Peace, etc.
- Council's Judgment - requires a bit of cooperation from our opponents, but it can deal with hexproof and indestructible things. Better in 1v1, or if you happen to be behind.
- Phyrexian Revoker, Leyline of the Void, Aura of Silence, and other hate cards - if specific strategies are prevalent in your meta, consider targeted hate for them. We expect hate cards for our strategy, so turnabout is fair play.
- Wrath of God, Scourglass, Austere Command. and other board wipes - if you find boards getting out of control, consider blowing everything up. This deck focuses more on artifacts than creatures, so we're not harmed that badly if all the creatures die.
- All is Dust - a lot of our deck is colorless, so this is a particularly asymmetric board wipe.
- Cranial Plating and Magister Sphinx - more aggressive options, if you want to interact with your opponents' life totats.
- Wurmcoil Engine, Sharding Sphinx, and other artifact creatures - other good targets for Sharuum, if you want a more combat-focused deck.
- Mindslaver - not my sort of thing, but this deck is very capable of locking someone out with it - either by recurring it with Sharuum, or Academy Ruins. Don't do this if you want to keep your friends.
- Despark - deals with most problems, for a cheap price. It doesn't hit some hate pieces though (such as Rest in Peace), so don't count on it to solve every problem.
- Crush Contraband - exiles two problems.
- Crystal Shard - taxes our opponents' mana, or bounces things if they're not paying attention. However, the primary purpose here is to bounce our own creatures - either to protect them from removal, or to retrigger ETB effects.
tutor
Show
Hide
Tutors are extremely useful in Commander due to the singleton nature of the format - they let you either find the perfect answer to a problem, or find a missing combo piece. Black grants us access to general tutors capable of fetching anything, while white and blue have tutors for artifacts specifically.
- Artificer's Intuition - Survival of the Fittest, but for only one mana artifacts. One of the better enablers for our trinket-based strategy.
- Muddle the Mixture - not bad as a counterspell, but primarily here for its transmute ability - it can fetch either half of the Thopter Foundry + Sword of the Meek combo, or any other two mana card we may desire.
- Trinket Mage - the reason why I keep referring to one-mana artifacts as 'trinkets'. Works great with flicker effects.
- Whir of Invention - tutors up an artifact at instant-speed. Can be a bit expensive, but improvise makes things easier.
- Tezzeret the Seeker - often gets cashed in immediately for a four-mana combo piece like Krark-Clan Ironworks, but can also do things like fetch up artifact lands or mana rocks, or tick up to untap things.
other options
Show
Hide
There are many options available. If we're trying to assemble a bunch of combo pieces, one limiting factor will often be mana, so we generally prioritize cheaper tutors.
- Enlightened Tutor - cheap and efficient tutor for any artifact in our deck.
- Fabricate - a reasonably efficient tutor for any artifact we may want.
- Demonic Tutor and Vampiric Tutor - both are extremely efficient tutors, and worth running if you have them.
- Wishclaw Talisman - significant downsides if you have to give it away... but an incredibly powerful option if you have a way to use it multiple times by untapping it, or if you have a way to sacrifice it.
- Treasure Mage, Trophy Mage, and Tribute Mage - we're building around one-mana artifacts, but if you're running a lot of good tutor targets at other CMCs, they're worth consideration. Trophy Mage can fetch up Basalt Monolith + Rings of Brighthearth if you want to generate infinite mana, while Tribute Mage can fetch up either half of the Thopter-Sword combo. Treasure Mage is often more of a value play, but another tutor for Salvaging Station is pretty useful.
- Lim-Dul's Vault - an instant-speed tutor to the top of your deck, assuming you're willing to pay some life.
- Entomb - puts a card directly into the graveyard for reanimation purposes.
- Sphinx Ambassador - can be useful if you have many artifact creatures you want to tutor up.
synergy
Show
Hide
This category covers the various cards we're running explicitly because they synergize with all the artifacts in our deck. Some of the cards here function primarily as combo pieces for winning the game, but most of them fulfill multiple purposes, depending on what cards we have access to. Many of them give us recursion for artifacts, or some other way to get multiple uses out of the artifacts we have. The power level of these cards is often dependent on our boardstate - if we have many toys to play with, they will do better than if we don't have anything going on.
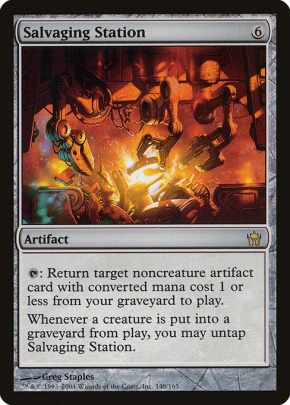
Salvaging Station gets its own section because the deck is built around it. We're running a lot of one-mana artifacts, and this is the primary payoff. The simplest usage for it is to grab back something like Aether Spellbomb to draw an extra card each turn, but you can also use it alongside Executioner's Capsule to machine-gun down creatures, or Dispeller's Capsule to get rid of troublesome artifacts and enchantments, or Codex Shredder to recur arbitrary cards over and over.... pretty much any of the one-mana artifacts we have are useful to recur repeatedly with it.
Its untap ability also lets it function as a combo piece, turning creature deaths into other resources.
- Altar of the Brood - one of the few cards in the deck that pretty much only functions as a combo piece. It makes up for its relatively low impact with absurd efficiency. It is possible to mill people out fairly if it sticks around for a long time, but most decks have enough graveyard synergies to make that a poor plan.
- Manifold Key - lets us double-dip on tap abilities, and give our artifact creatures pseudo-vigilance. It also has some political considerations if we want to help an opponent get their creatures through.
- Dance of the Manse - recurs a bunch of artifacts at a fair price. The animation ability can be a bit awkward due to it turning on creature removal and causing summoning sickness, but beating down with a bunch of 4/4s can be relevant if you don't expect a board wipe.
- Sword of the Meek - mostly here for its synergy with Thopter Foundry, but it's also a fairly common card to discard to Thirst for Knowledge or sacrifice to Trading Post.
- Thopter Foundry - a sacrifice outlet for our artifacts to protect them from exile. Gains life, makes blockers, combos with Sword of the Meek.
- Scrap Trawler - a recursion engine if we have a way to sacrifice our artifacts, or it can help lessen the impact of mass artifact destruction. It also does silly things with Krark-Clan Ironworks, getting the latter banned in Modern.
- Clock of Omens - like Manifold Key, it lets us double-dip on tap abilities. Often used to untap mana rocks, but there are other uses too.
- Master Transmuter - cheats artifacts into play from hand, retriggers ETB effects, and pretty tricky to kill if you untap with it (since it can bounce itself back to hand in response to removal).
- Phyrexian Metamorph - a copy of the best artifact (or creature) on the field. Often used as a combo piece, but sometime there are better options.
- Mirrorworks - vaaaaaalue. Paying two mana for a copy of every artifact we play is a bargain.
- Roar of Reclamation - a good way to benefit from a stocked graveyard, or recover from a boardwipe. Notice that it is a symmetric effect - be sure to check your opponents' graveyards before casting.
Salvaging Station
Show
Hide
Salvaging Station gets its own section because the deck is built around it. We're running a lot of one-mana artifacts, and this is the primary payoff. The simplest usage for it is to grab back something like Aether Spellbomb to draw an extra card each turn, but you can also use it alongside Executioner's Capsule to machine-gun down creatures, or Dispeller's Capsule to get rid of troublesome artifacts and enchantments, or Codex Shredder to recur arbitrary cards over and over.... pretty much any of the one-mana artifacts we have are useful to recur repeatedly with it.
Its untap ability also lets it function as a combo piece, turning creature deaths into other resources.
other options
Show
Hide
- Open the Vaults - a mana cheaper than Roar of Reclamation, but it also recurs our opponents' enchantments. Very much still worth consideration though.
- Myr Retriever - grabs back an artifact when it dies. Does interesting things alongside Scrap Trawler and Krark-Clan Ironworks that are way too complicated to explain here.
- Sculpting Steel - Phyrexian Metamorph: original flavor edition. Does most of the same things, at the cost of a little less flexibility.
- Voltaic Key - Manifold Key #2, in case you're particularly heavy on tap abilities.
- Time Sieve - turn artifacts into extra turns. Often played alongside the Thopter-Sword combo, or Thopter Assembly.
- Panharmonicon and Venser, the Sojourner - not an effect that the deck is built around, but we do have a lot of useful ETB effects.
- Ghostly Flicker - as above. There are some interesting things you can do with it alongside Sharuum and Torrential Gearhulk.
- Traumatize and Tunnel Vision - if you want to go all-in, using them to set up Open the Vaults or Roar of Reclamation can be a flashy way to win.
- Tezzeret, Master of the Bridge, Tezzeret, Artifice Master, and other Tezzerets - as a character originally from Esper, pretty much all of Tezz's versions have a lot of synergy with an artifact-based strategy.
- Pull from Eternity - if you want even more redundancy for your favorite combo piece.
utility lands
Show
Hide
One of the nice things about running so many artifacts is that the high number of colorless cards means we can get away with playing a decent number of utility lands. We have enough card draw that running mana sinks in the land slot isn't that important, but Expedition Map is another trinket that could be run if you want to lean into this theme.
- Bojuka Bog - a bit of incidental grave hate.
- Buried Ruin - more artifact recursion.
- Darksteel Citadel - a trinket. Sometimes, you just want to use Trinket Mage to hit your land drop.
- Inventors' Fair - a bit of incidental lifegain, but the main draw here is the tutor ability, which makes the deck even more consistent.
- Seat of the Synod - a second artifact lands. Blue is our primary color, and it lets us activate Artificer's Intuition.
other options
Show
Hide
- Wasteland, Strip Mine, and other land hate - we don't really care about lands like Maze of Ith, but still reasonable inclusions if you want to build around Crucible of Worlds.
- Phyrexia's Core - a sac outlet for artifacts, to save them from exile.
- Nephalia Drownyard - lets us fill our graveyard more.
- Academy Ruins - recurs artifacts, at the cost of our draw step. Also good for recurring Sharuum if she gets too expensive to cast from the command zone.
mana lands
Show
Hide
We run a lot of colorless cards, which means we don't require as much fixing as some decks. Our primariy color is blue, followed by white, then black, and our manabase reflects this.
- Island (x5), Plains (x4), Swamp (x2) - we don't have as many ways to fetch out lands as a green deck would, but we do have things like Solemn Simulacrum that fetch our basics. It's possible to run fewer basics, but at that point you may be making yourself even more vulnerable to nonbasic hate such as Blood Moon and Back to Basics. Alternatively: run more mana rocks to play through the hate, or just accept the loss and move on.
- Ancient Tomb - fast mana is good.
- Arcane Sanctum - generates all our colors.
- Azorius Chancery - a bit of mana smoothing in the land slot. Don't run if you're worried about land destruction.
- Caves of Koilos - untapped fixing.
- Drowned Catacomb, Glacial Fortress, and Isolated Chapel - usually untapped fixing. Better with more lands with basic land types.
- Exotic Orchard - untapped fixing, if a bit high-variance. It will usually provide at least two of our three colors.
- Nimbus Maze - untapped fixing. Better if you have more lands with basic land types.
- Path of Ancestry - a bit of fixing and some card selection.
- Prairie Stream and Sunken Hollow - usually untapped fixing, but depends on how many basics you're running.
- River of Tears - untapped fixing, if a bit finicky.
- Restless Anchorage - tapped fixing, but it generates artifact tokens and provides a little filtering.
- Shipwreck Marsh - usually enters untapped, provides solid fixing.
- Spire of Industry - untapped fixing, assuming we have artifacts.
- Temple of Deceit - tapped fixing, but a bit of incidental scrying to smooth our draws.
- Watery Grave - untapped fixing.
other options
Show
Hide
More than any other category, your manabase is going to be defined by your budget. This deck doesn't have that strict of color requirements due to running so many colorless cards, so it is possible to function with a suboptimal manabase. Untapped fixing lands are generally preferred over tapped lands. However, but we don't have a particularly strong need for basics, which means a tapped dual with upside can be worth consideration over an untapped basic.
- Underground Sea, Godless Shrine, and other untapped duals - basic land types have many synergies in the land slot, and untapped fixing lands are very useful.
- Flooded Strand and other fetchlands - better when you have more lands with basic land types, but they're more untapped fixing. Good with Crucible of Worlds, if you're running it.
- Temple of Silence, Creeping Tar Pit and other tapped-lands-with-upside - can be good if you want more value in your land slot.
- Dismal Backwater, Dimir Guildgate, Terramorphic Expanse, and other tapped-lands-without-upside - the fixing usually isn't worth the cost of entering tapped. You can run them over basics if you find yourself having issues.
- Mishra's Workshop - strong enough to build a Vintage deck around, and good in Commander too.
- Glimmervoid - an untapped fixing land. Beware of mass artifact removal.
.
Notable CombosThis deck's primary win condition is to assemble an infinite combo, of which we have many in the deck. Some combos are simple, requiring only 2-3 cards, while more complicated ones may require 6 or more cards. As a result, creativity is an important part of playing this deck - there are a lot of incidental synergies that can come up, so it is important to be able to evaluate what you can do with your current board, and if any cards can expand those possibilities. This list is definitely not exhaustive.
combos
Show
Hide
- Sharuum the Hegemon + Phyrexian Metamorph - probably the most well-known Sharuum combo. Have Metamorph copy Sharuum. One of them will die as a state-based action due to the Legend rule before Sharuum's trigger goes on the stack. Then put the trigger on the stack targeting the deceased artifact, returning it to the battlefield. This creates a loop. Add in Altar of the Brood to mill out your opponents.
- Sword of the Meek + Thopter Foundry - sacrifice Sword to Foundry to make a 1/1 Thopter, which returns Sword to the battlefield. Add in any extra mana production, such as Krark-Clan Ironworks to go infinite.
- Sharuum the Hegemon + Mirrorworks - when Sharuum enters, target any artifact in our graveyard, then pay 2 mana to make a token copy of her. As with the Metamorph combo, let Sharuum die, and have the copy's trigger return Sharuum. This lets us pay 2 mana repeatedly to return as many artifacts from our battlefield as we have mana for (and we can also copy those artifacts). Add in Krark-Clan Ironworks and we can generate infinite colorless mana by sacrificing Sharuum and the token copy, letting us make many copies of all of our artifacts.
- Salvaging Station + Manifold Key + Krark-Clan Ironworks - pay 1 mana to use Manifold Key to untap Salvaging Station, then sacrifice Key for 2 mana. Tap Salvaging Station to recur Manifold Key. Repeat for infinite colorless mana.
engines and synergies
Show
Hide
- Salvaging Station + Executioner's Capsule - sacrifice Capsule to destroy a creature, which causes Station to untap, so we can recur Capsule. Effectively lets us cast Doom Blade as many times as we want.
- Codex Shredder + Dance of the Manse or Roar of Reclamation - use Codex Shredder to recur your mass reanimation spell, then cast that spell to recur Codex Shredder. Lets you recur all your things repeatedly, which has some interesting applications alongside Krark-Clan Ironworks.
- Sharuum the Hegemon + Crystal Shard - use Sharuum to recur Shard. Shard bounces Sharuum to hand. Sharuum recurs something else. An expensive engine, but sometimes it's worth doing. Alternatively, a cheaper engine would be to bounce Baleful Strix repeatedly, or to use Master Transmuter to do the bouncing.
- Krark-Clan Ironworks + Scrap Trawler - sacrifice a thing for mana and use it to recur something cheaper. Can generate very large amounts of value, especially if you have some way to recur more expensive cards and go back up the chain.
.
StrategyWe are a combo deck, so our overall goal is to assemble a specific set of cards we can use to win. That doesn't mean we have to go off as fast as possible though - trying to go off and being stopped by a piece of instant-speed interaction will often leave us in a bad position. If we're under a lot of pressure, we can search for combo pieces more aggressively. If we're not under pressure, we can instead acquire some protection or redundancy before we try to combo... or we can just wait for our opponents run out of artifact removal or tap out.
Opening Hand
Look for lands, ramp, and card draw. Combo pieces usually don't contribute much in the early game. Don't be afraid to burn a tutor on finding more mana or a card draw engine.
Early Game
Play mana rocks and cheap trinkets. We want to set things up for our recursion engines later on, and those require having artifacts in the graveyard to recur. Try to fill the graveyard a bit so Sharuum can get some value, but don't blindly dump things in there - we only need one artifact in our graveyard for Sharuum to function, and having too many just makes a magnet for grave hate.
Mid Game
Try to assemble some sort of card advantage engine, whether it be Staff of Nin, Muzzio, Visionary Architect, or something else. At this point, you may want to consider keeping important combo pieces in hand if they don't appear to have any board impact. Keep an eye out for mass artifact removal, and try to make sure you have a way to recover if something goes wrong - either by having a full hand, or some mass recursion.
Late Game
If you think you have enough combo pieces to assemble something, try to win. If you're missing something, hold back until you find a tutor. At this point, try to figure out what sort of interaction your opponents may have, and how things can go wrong - is it possible for you to protect the combo, or force it through with some recursion? Is there any on-board hate that you need to deal with before comboing? If all else fails, Sharuum is a decently sized flier, so beating down isn't a terrible plan C.
.
Change Log
changelog
Show
Hide
8/10/2019 - initial version
2/8/2020 - THB updates
2/8/2020 - THB updates